Post History
Shutter speed. This controls how long light reflecting off of objects hits the sensor. The longer the shutter speed, the brighter the image. So a shutter speed of 1/50 would make the image bright...
#3: Post edited
by
 10 Rep
·
2020-09-10T21:59:50Z (over 4 years ago)
10 Rep
·
2020-09-10T21:59:50Z (over 4 years ago)
# Here are the meanings of all the terms:- 1. Shutter speed. This controls how long light reflecting off of objects hits the sensor. The longer the shutter speed, the brighter the image. So a shutter speed of 1/50 would make the image brighter than if it was 1/500.
- The disadvantage of having a slow shutter speed is that if you shoot something that's moving, then you get a motion blurry photo. So a faster shutter speed is better for that.
For instance, say you are trying to get a good picture of a water droplet. A shutter speed of 1/1000 would be good to get the water droplet in all it's glory. But you would need to compensate for it by having a higher aperture, or a higher ISO.2. ISO. This is the sensor's sensitivity to light. So the higher, the brighter. But the higher it is, the more grain there is on your photo, so beware! In film, ISO is the measure of how much grain there is on a photo. You couldn't adjust it back then, since you bought film and it had one specified ISO.3. Aperture. Also known as f-stop, this is how large the opening of the lens is. So if the aperture is f/5.6, then the image is brighter than if the aperture is f/7.5. The disadvantage of having a high aperture is that the Depth Of Field (or how much of the area the camera is capturing that is acceptably sharp) is much thinner, so it is harder to focus on your subject. This can also be good if you want a dreamy background effect, but bad if you are trying to capture a moving subject and you can't focus. Bird photographers, for instance, always have a very high aperture, so the background is completely blurred. However, landscape photographers always have a low aperture since they want to capture a large scene without it being blurry.- # Manual or Auto?
The advantage of adjusting these manually is that you can decide if you want motion blur, or a blurry background, or a grainy photo. Say you are taking a photo of some water. Most people want to blur the water so it appears smooth. With manual, this is simple to do. Just set the shutter speed to 2 seconds (more if you want extra blur) and compensate for the extra brightness by throwing the aperture down completely. You can also decrease the ISO if you wish.With Auto, you can't do this, since the camera thinks in terms of exposure only. So if the scene is partially sunny, it will set the shutter speed to something like 1/250, which will get you a normal photo, without that motion blur.- But you don't **_have_** to use manual mode. You can use one of the priority modes. Let's take the previous real world example. You set your camera to shutter priority, and then set the shutter speed to 2 seconds. You take a photo, and BOOM. The photo is perfectly exposed, and you have that motion blur. You didn't even have to adjust the aperture!
- Think of the priority modes like this: You decide almost everything, in order to control how the photo will come out, and the camera just makes sure your photo is perfectly exposed. Use shutter priority when you are trying to capture something fast, and aperture priority when you want to capture a landscape or achieve a nice dreamy, blurry background.
Many professionals use priority modes along with manual, so if you do choose to use it, don't think it's for noobs.
- 1. Shutter speed. This controls how long light reflecting off of objects hits the sensor. The longer the shutter speed, the brighter the image. So a shutter speed of 1/50 would make the image brighter than if it was 1/500.
- The disadvantage of having a slow shutter speed is that if you shoot something that's moving, then you get a motion blurry photo. So a faster shutter speed is better for that.
- For instance, say you are trying to get a good picture of a water droplet. A shutter speed of 1/1000 would be good to get the water droplet in all it's glory. <br><h3>Disadvantage <br> </h3>When you adjust the shutter speed to make it faster, you are essentially limiting the amount of light that hits the sensor. So your image will be much darker. The same applies for the opposite. When you make the shutter speed slower, light has more time to hit the sensor, meaning your image will be consequently brighter.
- 2. ISO. This is the sensor's sensitivity to light. In film, ISO is the measure of how much grain there is on a photo. You couldn't adjust it back then, since you bought film and it had one specified ISO. ISO is proportionate to the brightness of an image. So if you raise your ISO from 100 to 200, then the brightness of your image will also double. Increasing your ISO when taking a photo in the dark is always something helpful. <br><h3>Disadvantage</h3>Along with increasing the brightness of a photo, ISO can also add noise to your image, since the higher the ISO, the more sensitive it is to light. Even small deviations in light show up prominently in your photo. If you dislike noisy photos, then stay away from increasing your ISO to something like 6400!
- 3. Aperture. Also known as f-stop, this is how wide the diaphragm of the lens is. So if the aperture is f/5.6, then the image is brighter than if the aperture is f/7.5. Since the aperture is just the ratio between how wide and how covered the lens is, you will always get number that are perfect square roots of irrational numbers. <br><h3>Disadvantage</h3> When you have a wide aperture, you are effectively decreasing the Depth Of Field. The Depth of Field is an area where any object placed in that field will appear to be sharp. If it is placed before the DOF or after, the object will appear blurry. The further away, the more blurry, since the DOF fades instead of dissapear. Disadvantage might be a wrong term, since bird photographers, for instance, always have a very wide aperture, so the background is completely blurred. However, landscape photographers always have a low aperture since they want to capture a large scene without it being blurry. So it depends on what you want to do. Most of the time I have the aperture wide open since I like taking pictures of birds and inanimate objects. Landscapes have never appealed to me :)
- # Manual or Auto?
- You may have heard of manual mode. This basically means a mode where you decide ISO, Aperture, Shutter speed, and a few more things. This scares most new photographers, and they usually just switch to auto as soon as they get their DSLR. The advantage to adjusting everything manually is that you can decide how the photo comes out. You decide if you want motion blur, or a blurry background, or a grainy photo (some people like old style photos). <br>Say you are taking a photo of some water. Most people want to blur the water so it appears smooth. With manual, this is simple to do. Just set the shutter speed to 2 seconds (more if you want extra blur) and compensate for the extra brightness by throwing the aperture down completely. You can also decrease the ISO if you wish.
- With Auto, you can't do this, since the camera thinks in terms of exposure only. So if the scene is partially sunny, it will set the shutter speed to something like 1/250, and the aperture will be almost wide open, which will get you a normal photo, without that motion blur. The camera, in other words, doesn't know how **_you_** want the photo to come out. It only knows about exposure, and that's it.
- But you don't **_have_** to use manual mode. You can use one of the priority modes. Let's take the previous real world example. You set your camera to shutter priority, and then set the shutter speed to 2 seconds. You take a photo, and BOOM. The photo is perfectly exposed, and you have that motion blur. You didn't even have to adjust the aperture!
- Think of the priority modes like this: You decide almost everything, in order to control how the photo will come out, and the camera just makes sure your photo is perfectly exposed. Use shutter priority when you are trying to capture something fast, and aperture priority when you want to capture a landscape or achieve a nice dreamy, blurry background.
- Many professionals use priority modes along with manual, so if you do choose to use it, don't think it's for noobs. I use manual personally, because for some reason I like doing extra work instead of getting it easy with something like aperture priority.
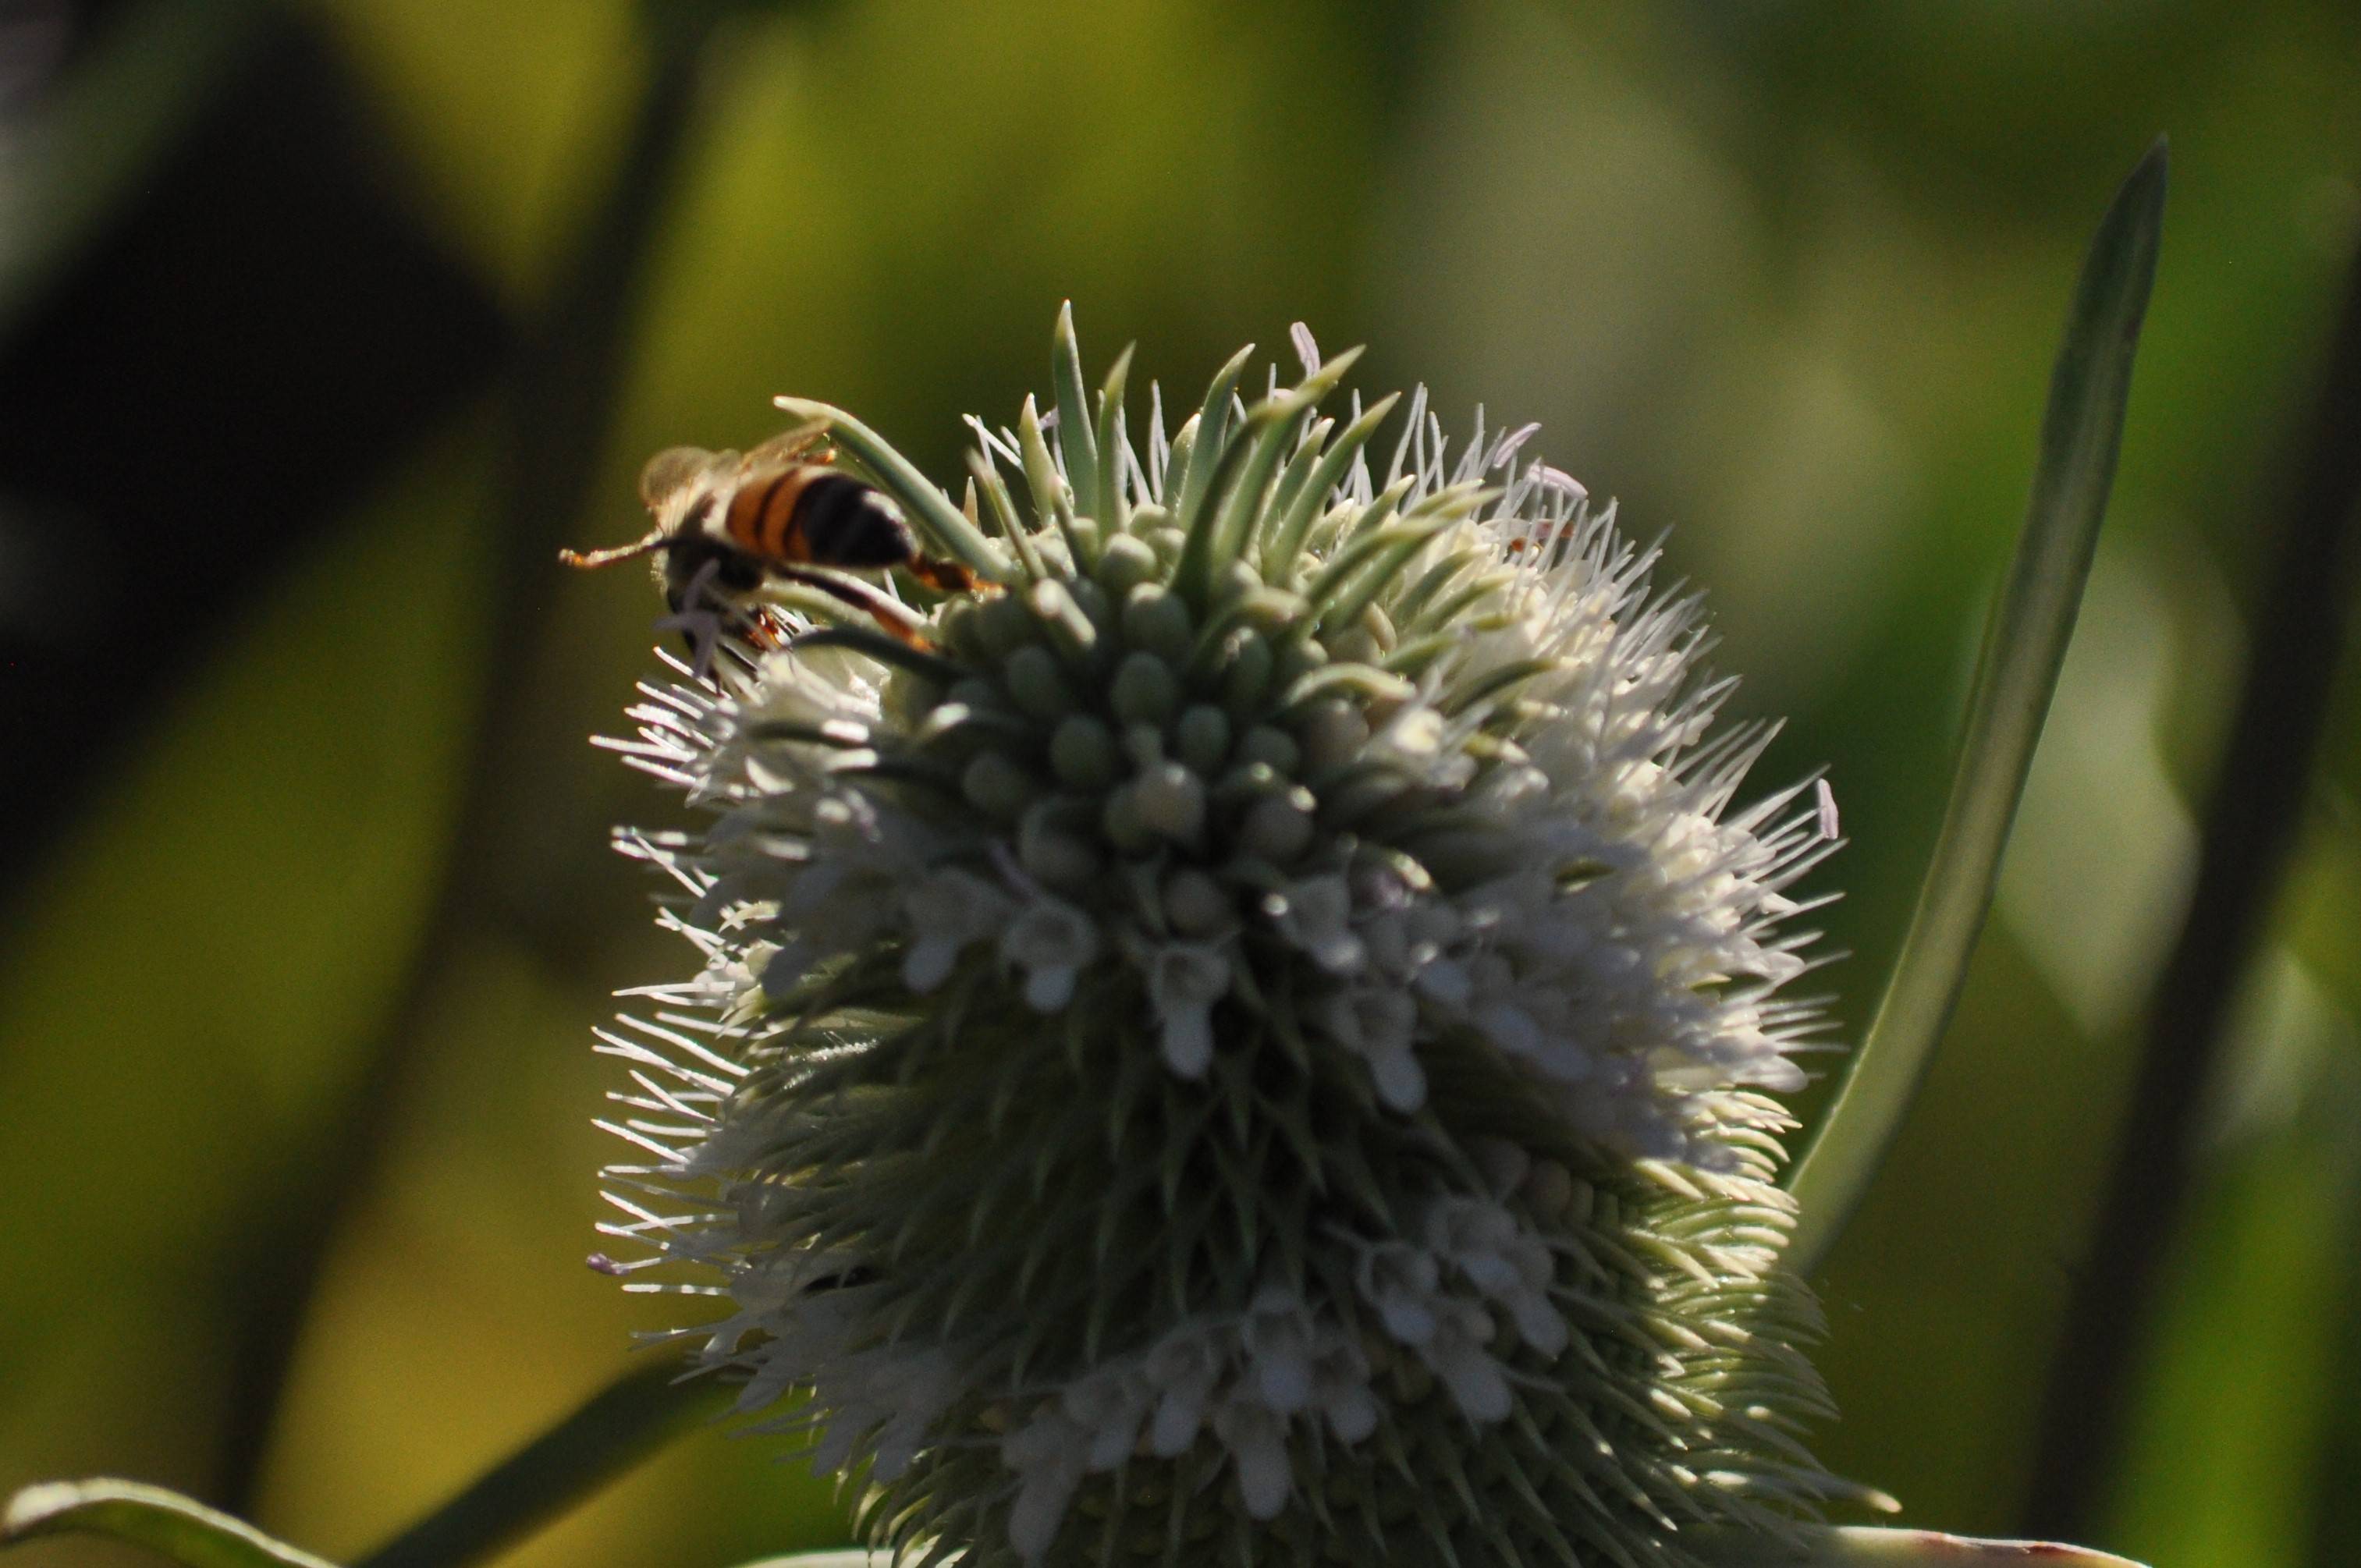
- I captured this photo with aperture priority, though:
- 
#2: Post edited
by
10 Rep
·
2020-09-10T21:30:31Z (over 4 years ago)
Here are the meanings of all the terms:- 1. Shutter speed. This controls how long light reflecting off of objects hits the sensor. The longer the shutter speed, the brighter the image. So a shutter speed of 1/50 would make the image brighter than if it was 1/500.
- The disadvantage of having a slow shutter speed is that if you shoot something that's moving, then you get a motion blurry photo. So a faster shutter speed is better for that.
2. ISO. This is the sensor's sensitivity to light. So the higher, the brighter. But the higher it is, the more grain there is on your photo, so beware!3. Aperture. Also known as f-stop, this is how large the opening of the lens is. So if the aperture is f/5.6, then the image is brighter than if the aperture is f/7.5. The disadvantage of having a high aperture is that the Depth Of Field (or how much of the area the camera is capturing that is acceptably sharp) is much thinner, so it is harder to focus on your subject. This can also be good if you want a dreamy background effect, but bad if you are trying to capture a moving subject and you can't focus.The advantage of adjusting these manually is that you can decide if you want motion blur, or a blurry background, or a grainy photo. If manual mode scares you, try using one of the priority modes. This allows you to set the ISO and either shutter speed or aperture, and the camera decides the exposure so you get a nicely exposed image.The disadvantage to using manual mode is that you may miss a photo that you might have wanted to take quickly. This can sting, and everyone's faced this before :)
- # Here are the meanings of all the terms:
- 1. Shutter speed. This controls how long light reflecting off of objects hits the sensor. The longer the shutter speed, the brighter the image. So a shutter speed of 1/50 would make the image brighter than if it was 1/500.
- The disadvantage of having a slow shutter speed is that if you shoot something that's moving, then you get a motion blurry photo. So a faster shutter speed is better for that.
- For instance, say you are trying to get a good picture of a water droplet. A shutter speed of 1/1000 would be good to get the water droplet in all it's glory. But you would need to compensate for it by having a higher aperture, or a higher ISO.
- 2. ISO. This is the sensor's sensitivity to light. So the higher, the brighter. But the higher it is, the more grain there is on your photo, so beware! In film, ISO is the measure of how much grain there is on a photo. You couldn't adjust it back then, since you bought film and it had one specified ISO.
- 3. Aperture. Also known as f-stop, this is how large the opening of the lens is. So if the aperture is f/5.6, then the image is brighter than if the aperture is f/7.5. The disadvantage of having a high aperture is that the Depth Of Field (or how much of the area the camera is capturing that is acceptably sharp) is much thinner, so it is harder to focus on your subject. This can also be good if you want a dreamy background effect, but bad if you are trying to capture a moving subject and you can't focus. Bird photographers, for instance, always have a very high aperture, so the background is completely blurred. However, landscape photographers always have a low aperture since they want to capture a large scene without it being blurry.
- # Manual or Auto?
- The advantage of adjusting these manually is that you can decide if you want motion blur, or a blurry background, or a grainy photo. Say you are taking a photo of some water. Most people want to blur the water so it appears smooth. With manual, this is simple to do. Just set the shutter speed to 2 seconds (more if you want extra blur) and compensate for the extra brightness by throwing the aperture down completely. You can also decrease the ISO if you wish.
- With Auto, you can't do this, since the camera thinks in terms of exposure only. So if the scene is partially sunny, it will set the shutter speed to something like 1/250, which will get you a normal photo, without that motion blur.
- But you don't **_have_** to use manual mode. You can use one of the priority modes. Let's take the previous real world example. You set your camera to shutter priority, and then set the shutter speed to 2 seconds. You take a photo, and BOOM. The photo is perfectly exposed, and you have that motion blur. You didn't even have to adjust the aperture!
- Think of the priority modes like this: You decide almost everything, in order to control how the photo will come out, and the camera just makes sure your photo is perfectly exposed. Use shutter priority when you are trying to capture something fast, and aperture priority when you want to capture a landscape or achieve a nice dreamy, blurry background.
- Many professionals use priority modes along with manual, so if you do choose to use it, don't think it's for noobs.
#1: Initial revision
by
10 Rep
·
2020-09-08T18:10:25Z (over 4 years ago)
Here are the meanings of all the terms:

1. Shutter speed. This controls how long light reflecting off of objects hits the sensor. The longer the shutter speed, the brighter the image. So a shutter speed of 1/50 would make the image brighter than if it was 1/500.
The disadvantage of having a slow shutter speed is that if you shoot something that's moving, then you get a motion blurry photo. So a faster shutter speed is better for that.

2. ISO. This is the sensor's sensitivity to light. So the higher, the brighter. But the higher it is, the more grain there is on your photo, so beware!

3. Aperture. Also known as f-stop, this is how large the opening of the lens is. So if the aperture is f/5.6, then the image is brighter than if the aperture is f/7.5. The disadvantage of having a high aperture is that the Depth Of Field (or how much of the area the camera is capturing that is acceptably sharp) is much thinner, so it is harder to focus on your subject. This can also be good if you want a dreamy background effect, but bad if you are trying to capture a moving subject and you can't focus.

The advantage of adjusting these manually is that you can decide if you want motion blur, or a blurry background, or a grainy photo. If manual mode scares you, try using one of the priority modes. This allows you to set the ISO and either shutter speed or aperture, and the camera decides the exposure so you get a nicely exposed image.

The disadvantage to using manual mode is that you may miss a photo that you might have wanted to take quickly. This can sting, and everyone's faced this before :)