How do I take crisp pictures of flames at night (with a cell phone)?
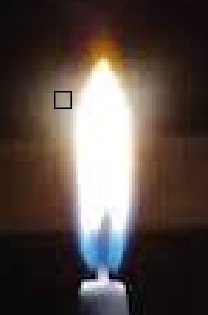
When I take pictures of (lit) candles in otherwise-darkened rooms, the flames always come out nondescript (blurry?) as in the following example:

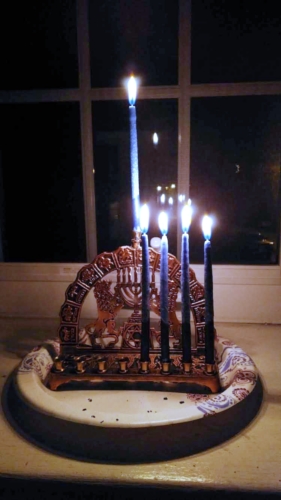
I took this picture with a hand-held cell phone. The subject is obviously not moving, so I could brace the camera somehow if that would help. I suspect my problem isn't camera stability but, rather, not knowing what settings to use for this kind of camera.
I've tried the default and "night mode" settings, without a flash. I've tried longer exposures (using the slider on the simple-minded camera software on the phone) but the flames were still blurry, perhaps because even with the camera braced, flames are not completely static. Should I instead be lighting the room somehow (and then maybe darkening it in post-processing)?
2 answers
There are likely at least two issues at play here.
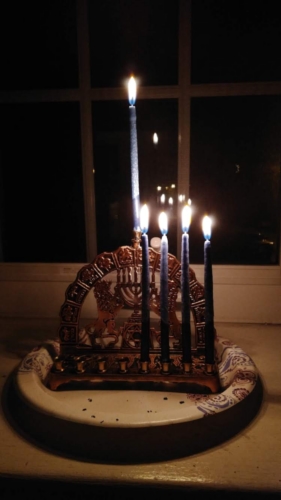
First, look at the other elements in the photo. The candelabra, the window behind it, the edge of the windowsill. All of those are fairly sharp, with much more well-defined edges than the candle flames. Blur to the flames due to camera motion therefore seems unlikely.
Second, you probably know this, but remember that the "flame" is actually mostly still burning soot. Air convection carries the flame upward, but there might still be some turbulence around it which could cause some of that to drift off to the sides. When you're looking at the flame, your eyes adjust to the brightness of the flame, but the camera records what's actually there without, beyond the autoexposure system, caring (much) about the brightness in any particular spot.
So "the subject is obviously not moving" isn't really true if by "the subject" we mean the flames that you're trying to capture.
To reduce motion blur, you need to use a shorter exposure time. However, because less light is captured during a shorter exposure, this also makes the picture darker overall, which you'll need to compensate either by increasing light sensitivity ("ISO"), by using a larger aperture (lower f/-number; f/2 is a larger size aperture than f/4), or adding more light from elsewhere, or more than one of those. Which exact choice you make depends on the effect you're after.
As an experiment, I would suggest using whatever settings you have access to to reduce the exposure time used when taking the picture. If you don't do anything else, the picture will probably come out dark, but that's okay for the moment. A 1/500 or 1/1000 second exposure might be a good starting point. Look at the flames; they should be more distinct.
Assuming that works, then consider how you can brighten the capture back up. I would suggest increasing the aperture size (decreasing the f/-number) if possible, and second to that, increasing the sensitivity setting (the "ISO" number). Increasing the aperture size will reduce the depth of field, but it looks like you've got plenty enough depth of field that this won't be an issue. (With their small sensors, cellphone cameras typically have very large depth of field to begin with.) Increasing sensitivity will increase image noise, which is why it's usually a good idea to keep the sensitivity as low as possible to get the exposure you want.
If all else fails, shine a diffuse light toward the scene to increase the overall brightness, then darken the image in post-processing. Shining a flashlight onto the ceiling above the scene should work okay without introducing too much in the way of shadows, reflections or glare.
The problems
- The basic problem is that the flames are small bright things in what is otherwise a dark scene. The automatic exposure system then messes up because it strives to make the average come out right.
Some exposure systems do look at highlights and adjust somewhat, but in most ordinary situations, it's OK to overexpose small highlights that are tiny fractions of the overall picture area. For example, think of taking a picture of a car in sunlight. There will be a few very bright spots where the sun is reflected off the shiny finish. You don't want those highlights to bloom out, but you don't want the overall exposure adjusted so that those highlights are just at the limit of the sensor range either. If that was done, the rest of the picture would be very dark.
Roughly, the fancy software in your cell phone that controls the camera can't tell the difference between the candle flames (that you do want detail in), and the reflective highlights off a car (that you don't want detail in). The user interfaces on cell phones are optimized for low intimidation factor for the masses, not for good control by the small fraction of users that would actually know what to do with it.
- The blooming around the candle flames is due to them being overexposed.
No lens system and sensor are perfect. Some small fraction of the light from any one point of a scene will end up in every other part of the picture. Most of the time you don't notice that because that fraction is small, and the intended light at any point in a scene overwhelms the spill-over from other parts.
This spill-over is stronger nearby. That's why your flames have this halo effect around them.
Cell phones are particularly susceptible to this due to their very small-diameter lenses, and very close-spaced sensor elements. These are both artifacts of cell phones needing to be small, light, very little distance available between the lens and the sensor it must focus on, and other things that must be crammed into the small limited space (like the battery).
- There is a very large dynamic range in the scene you want to capture. The flames are many many times brighter than the rest of the scene they are illuminating. Basically, you're trying to capture the light source and the scene it is illuminating in one picture. That's always a problem. Think of taking a sunlit picture outdoors, with the sun in the picture. One or the other isn't going to come out well. The ratio of light source to scene brightness is similar in both cases.
The solution
So, what do you do about it? This depends highly on what your particular cell phone camera can do, and what controls the software gives you access to. This varies widely across cell phones, with the state of the art getting rapidly better. Even just a few years' later model can make a significant difference.
To answer this, I'll describe what I'd do with a real camera that has professional-level controls and feature. At least that will help with understanding, but maybe you can actually do this with your cell phone. Again, this is highly dependent on the specific cell phone model, so I can't really say what you can do with your cell phone.
The first thing I'd do is mount the camera on a tripod. That allows for longer exposure than is possible to hand-hold without visible shaking in the picture. Cell phones don't generally have tripod mounts, but it shouldn't be hard to rig up something that holds the phone in place. I'd say the limit for a hand-held shot is about 1/30 second for typical cell phone focal lengths.
Another advantage of the tripod is that you can take multiple pictures, knowing that everything that doesn't move in the scene (everything except the flames) will be in the same place in multiple pictures. We'll make use of this below, under Extreme solution.
The next step is finding an exposure where you are happy with the flames. Don't fuss about the background too much at this point. For the pro camera, I'd set ISO to the optimum for that camera (200 for my Nikon D3s, for example), and the aperture and shutter speed to manual. I know the automatic metering system will be fooled, so I'm going to make all the adjustments myself.
I'd probably start with a nice f-stop for the lens, like f/5.6, then see what shutter speed is required. If it turns out the shutter needs to be open so long that the flames blur, I'd open the lens more (lower f-stop number, like f/4.0, f/2.8), until the flames look good.
At that point, you've done what you can to make the flames look bright, but not clipped to the point of annoyance or excessive blooming. The other end of the dynamic range now is what it is, and is solely a function of what the sensor in your camera can do. In other words, for a single picture at least, you're stuck with what the sensor captured for the rest of the scene.
It's now up to post-processing. With the pro camera, I'd grab the "raw" image, and start from there. This is the raw sensor values, before any automatic processing applied by the software. This is definitely NOT a JPG file. Using raw sensor data is normal operating procedure for pros, but this simply might not be available on your cell phone.
Starting with the raw data, I'd apply various non-linear brightening algorithms in my post-processing software. This ends up amplifying the dark areas, while leaving the brightest spots the same. This is where I find out whether the sensor was able to capture enough detail in the dark areas in the first place. If so, then after some tweaking in post-processing, I'll get a good picture.
If you can't get a raw file, then you are most likely out of luck. The post-processing software in your phone will have picked something, and probably will have at least somewhat amplified the dark areas. That probably won't be good enough. In that case, try post-processing what you have anyway. Maybe there is enough to work with. However, you will probably see splotches in the dark area due to intensity resolution having been lost in the automatic process, or possibly never captured by the sensor in the first place.
At some point, you are going to run into limitations of the equipment. This kind of scene is pushing the boundaries, even of what pro equipment can do. While good photography is largely about the photographer, not the equipment, the equipment does enable certain things, especially in extraordinary conditions like this. If $300 cell phones could do all these things, there'd be no market for $5000 pro cameras. You may have to resign yourself to the fact that this is something your particular camera (the cell phone) just can't do.
The extreme solution
I alluded to multiple pictures above. There is a technique called HDR (High Dynamic Range) that uses multiple pictures at different exposures to capture an overall wider dynamic range than the sensor can do in a single shot. You take maybe 3 pictures, the first with the brightest areas properly exposed, then each another 2 f-stops more exposure than the previous. Clever software then stiches these together, taking the dark area detail from the last picture, and the bright area detail from the first, etc.
HDR can work well with static scenes. There will be some problems with your scene. First the flames move, and will be somewhat different between the pictures. Second, the software may have a hard time detecting and dealing with the bleed-over around the flames.
In your case, this comes down to how clever the HDR software is, what kind of user controls it provides, and how much effort you're willing to put into it to get a good final result. I haven't done this personally, so can't give much advice on this other than letting you know it exists. I have seen some good results produced by others using HDR techniques.
It's not motion blur
I can see from recent voting patterns that people are still under the misconception that the fuzziness or halo around the flames is due motion blur. It's not. It's due to gross overexposure of the flames. Not only does this follow from the simple logic of high dynamic range due to the light source and what it illuminates being in the same picture, but we can see this by examining direct clues in the picture itself.
Take a look at the reflections of the flames off the window glass. We'll examine the top flame and its reflection in particular:

First, consider how much that reflection is attenuated relative to the direct view of the flame.
The reflection is off of window glass pretty much head-on. The point of windows is to let light thru, not to reflect it, and that's what they largely do. Since the vast majority of light hitting a window head on is transmitted thru the window, only a small portion can be reflected. And in this case, the reflection is further attenuated by two layers of window screen (once out and once back). With all these effects, it would be generous to say that the reflection is 1% as bright as the flame directly. That's basically 7 f-stops (1/128 of the original light).
Now let's closely examine the pixel values of the reflection. I blew up the pixels and looked at the numeric values with an image editor. The brightest parts of the reflection are solidly above 0.98 (on a scale of 0.0 to 1.0) in all three colors. In other words, it is exposed at the maximum or possibly beyond (there was some variation between adjacent pixels, probably due to the window screen).
So what does this prove? Even if we say the reflection is optimally exposed so that it is at the maximum of the sensor range without exceeding it, then the direct flame must be overexposed by 7 f-stops. That's a lot.
OK, so the direct flame is grossly overexposed. How does that prove the halo effect isn't caused by motion of the flame? Two ways:
- The reflection doesn't show the same halo.
If the flames moved during the exposure to cause the halo, then of course the reflection would appear to have moved the same way and exhibit the same smeared pattern. It clearly doesn't. The directly flame has sortof a "Bozo's hair" pattern, which is absent in the reflection. The reflection does appear somewhat fuzzy, but that is consistent with being behind the center of focus, and having passed thru two window screens. Most importantly, while the reflection is a little fuzzy, it's a different fuzzy than the direct flame.
- This is exactly the effect we should expect to surround a grossly overexposed bright spot.
The average intensity in the measurement rectangle shown below is (0.662, 0.606, 0.534), so let's say about 60% of the flame brightness in the final picture.
But, remember that the flame is overexposed by 7 f-stops, just that we can't measure that directly because the sensor clipped at 1.0. All together that makes the halo over 200x dimmer than the bright part of the flame. On the 8-bit brightness scale of 0-255, such as in JPEG files, that's just about 1 count.
So basically, this says that about 0.5% of light from one spot of the scene shows up in nearby pixels. That's not out of line for a cell phone camera that has a physically small lens aperture, and therefore considerable diffraction, little room to add measures to keep light from bouncing around near the image sensor, and probably not the cleanest lens. Dedicated cameras have lens caps and the lenses are regularly cleaned, but most people just put a cell phone in a pocket, and don't think about whether they're leaving fingerprints on the lens when retrieving it. Put a big fat thumbprint on the front of a real camera lens, and you'll start to see effects just like this one.
So what does all this mean?
Now that we know its not motion blur, but overexposure, we need to reduce the exposure to remedy the problem. One way to reduce exposure is to use a faster shutter speed, but we're doing it for a different reason. I haven't tested exposure times of flames, but my knee-jerk reaction is that any shutter speed you can successfully hand-hold is good enough to freeze a candle flame. I'm guessing down to 1/10 second is fine, but again, that's just a guess.
As to what to do about all this in more detail, see "The solution" above.
Post-processing
A scene with this huge a dynamic range is just not going to yield a good result with whatever automatic algorithms the phone manufacturer picked for you. It's going to take some deliberate post-processing.
Ideally this is done starting with the raw sensor data. That may not be available. Nonetheless, some amount of post-processing can be done on the JPG file that you're likely stuck with from the phone. I'll demonstrate a few techniques on your picture. For reference, here is your original scaled down to a smaller size:
Here is applying a little bit of non-linear brightening. The black and white ends of the range were held fixed, but the in-between values were sloshed more towards white:
This was what I call a "log brightening" of 2.0, which means the black end of the range was expanded by 22.0 = 4 times compared to the white end of the range. Your picture would benefit from a bit more, but this is where problems due to working from a JPG start to become apparent. Here is a log brighten of 4.0 (black expanded by 16x relative to white):
Note the blockiness under the plate and on the lower right window pane. This is because when the dark parts were expanded their quantization was also amplified. There may only have been one or two counts brightness difference between areas in the original, but the brightening amplified those differences to where there are clear jumps, making the result look splotchy.
Let's go back to log brighten 2.0 and try something else:
The originally looked very yellowish, because candle flames are quite yellow. Your eyes adapt to the color of ambient light, but the camera doesn't. Ideally there is something in the picture that you know is white. In situations like this, it's a good idea to take an extra picture with something nice and white in the scene, just so you can later use that as a reference. In this case I picked a small part of the plate at bottom right that is facing up, and declared it white.
I'm not trying to fix the original picture since that's really not possible, but hopefully this demonstrates some of the things that can be done in post-processing.

0 comment threads